Ingredients:
- 3 cups Water
- 1 1/2 tablespoon Granulated Yeast (active dry, instant, quick rise or bread machine is fine)
- 1 1/2 tablespoon Kosher Salt
- 6 1/2 cup Bread Flour
- 1/2 cup Cornmeal ( for dusting )
|
Instructions:
- Warm the 24 oz of water slightly. It should feel just slightly warmer than body temperature, about 100°F (38°C). In the large bowl of a standing mixer or a 6-quart container with a lid, mix the yeast, water, and salt. Don’t worry about getting the yeast to dissolve. Add the flour all at once, then use a spoon or stand mixer to mix until the flour is completely incorporated into the blobby dough that forms. (If you’re hand-mixing the dough and it becomes too difficult to incorporate all the flour with the spoon, just use very wet hands to press the mixture together.) Don’t knead the dough! It isn’t necessary. You’re finished when everything is uniformly moist, without dry patches. This is achieved in a matter of minutes and will yield a dough that’s wet and loose enough to conform to the shape of its container.
- Loosely cover the container and allow the dough to rise at room temperature until it begins to collapse or at least flattens on the top, about 2 hours. (Relax. You don’t need to monitor the doubling or tripling of its volume as you do with traditional recipes.)
- After 2 hours, refrigerate the dough and use it within 14 days. If your container isn’t vented, allow the gases to escape by leaving the lid or covering open a crack for the first couple of days in the fridge; after that, you can seal it. (You can use the dough anytime after the initial 2-hour rise, although the refrigerated wet dough is less sticky and easier to work with than dough at room temperature, so it’s best to refrigerate the dough overnight before handling it. Once refrigerated, the dough will seem to have shrunk back upon itself as though it will never rise again—that’s normal. Whatever you do, do not punch down this dough. You’re trying to retain as much gas in the dough as possible, and punching it down knocks gas out and results in denser loaves.)
- The day you wish to bake, dust a pizza peel or a baking sheet turned upside down with cornmeal or line it with parchment paper. Cut off a 1-pound piece of dough with a serrated knife or kitchen shears. Hold the dough in your hands and add more flour as needed so it doesn’t stick to your hands. (What you’re trying to do is surround the surface of the dough with flour so that it can be handled. Resist the temptation to get rid of all the stickiness by incorporating the flour into the dough.) Gently stretch the surface of the dough, tucking the ends underneath the ball and rotating it a quarter turn as you go. Most of the dusting flour will fall off, and that’s okay; it’s not intended to be incorporated into the dough. The bottom of the ball of dough may appear to be a collection of bunched ends, but it will flatten out and adhere during resting and baking. The properly shaped loaf will be smooth and cohesive and the entire shaping process should take no more than 20 to 40 seconds—don’t work the dough any longer or your loaves may be dense. Place the shaped ball of dough on the prepared pizza peel and let it rest for about 40 minutes. It doesn’t need to be covered. You may not see much rise during this period, but don’t fret. It will rise much more during baking.
- Preheat the oven to 425°F for at least 20 to 30 minutes. Preheat a baking stone on a middle rack for at least 20 to 30 minutes. Place an empty metal broiler tray on any rack that won’t interfere with the rising bread. (Do not use a glass pan as it’s likely to shatter.)
- Dust the top of the raised loaf liberally with flour and, using a serrated bread knife, slash a 1/2-inch-deep cross or tic-tac-toe pattern in the top. There’s no need to dust the flour off the loaf.
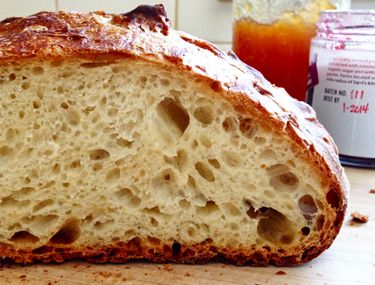
- Place the tip of the peel in the oven a few inches beyond where you want the bread to land. Give the peel a few quick forward-and-back jiggles and then sharply pull it out from under the loaf. Quickly but carefully pour about 1 cup of hot water into the broiler tray and close the oven door to trap the steam. Bake for a total of 20 to 35 minutes, until the crust is richly browned and firm to the touch. (Because the dough is so wet, there is little risk of drying out the interior, despite the dark crust.) A perfectly baked loaf will audibly crackle, or “sing,” when initially exposed to room temperature. Let the loaf cool completely, preferably on a wire rack for the best flavor, texture, and slicing. The crust may initially soften but will firm when cooled.
|